1 Installation
Since the KJuicer is not a program but a service rendered through the browser, a real installation is not necessary. But the first time you will have to go through a coupe of steps in order to use it.
1.1 Create an account/login
While it is immediately possible to read documents that have been highlighted through the KJuicer just from their own link, or highlight any web page simply by using the Extensions or the Bookmarklet, in order to be able to save your own versions and store them in your personal Wall, as well as identify documents as yours on the Public Wall, you need an account. An account is rather important especially if you underline your own pages, since without one (or without being logged in!) you risk losing your work: in case you lose the link of the highlighted page there would be no way to get it back, especially if it is encypted.
The KJuicer uses the open source infrastructure provided by Mozilla, the creators of Firefox, called Persona. If you already have an account with Persona you will be able to access the KJuicer infrastructure just by logging into your Persona Account, otherwise you can create the account.
To create an account, if you are not already on a KJuicer page go to http://unibocconi.kjuicer.com/cache/, and/or simply click on the Login button. Choose the Mozilla Persona option. It will present you with a new window where you can enter your email and then either login directly, if you already have a Persona account, or create a new account by simply entering a password. Mozilla Persona will send you a confirmation link to the email address provided, and by clicking it you will have your account activated.
As soon as the account is created and activated the Login button will be replaced by a Logout one, and you will have a Private Wall where all your personal KJ pages will be stored.
Currently the KJuicer is used on web pages, or by uploading your own documents.
1.2 Use on web pages
If you want to use the KJ on generic web pages, two instruments are available:
- The extension, available for Firefox and Chrome;
- The bookmarklet, for other browsers.
You can install both by going to this page
1.2.1 The extension
On the link in Paragraph 1.2 above you will find the two links for the Firefox and Chrome Extensions, and the instructions.
Once the Extension has been installed you will see a small icon with a stylized juicer on your browser’s toolbar. When you find a generic web page that you wish to underline with the KJuicer simply press it. In the Use section below you will find further details.
After installing the extension you need also to tell it where to assign your pages. There are currently two instances of KJuicer, a public one and one dedicated to UniBocconi. Please go to the extension page of your browser, and set the preferences of the extension to UniBocconi. That way the pages that you decide to highlight with the KJuicer will be stored on the UniBocconi server, and they will be displayed on the class’ Public Wall. In case you felt like using the tool for pages non related to your work in class you can set it to “Alpha Kjuicer”.
To do so:
- On Firefox you should click on the three line icon in the main toolbar and choose “Add-ons”. The same effect is achieved by going on the Menu “Tools/Add-ons”. Firefox will will open a new tab with a list of your extensions/add-ons, and you should click on the “preferences” button next to the KJuicer extension. Firefox will open the KJuicer extension page, scroll down to “Service Provider” and from there choose UniBocconi.
- On Chrome you should click on the three line icon in the main toolbar and choose “Othe Instruments/Extensions”. Chrome will open a new tab with a list of your extensions: click on the “Options” link next to the KJuicer one, and in the popup menu choose UniBocconi.
1.2.2 The bookmarklet
On the link in Paragraph 1.2 above you will find also the bookmarklet: it is the red button named “KJ Bookmarklet”. It is a technology that is slowly been phased out by browsers and websites, so it might not work always. But if you really need or want to use a browser different than the two currently supported ones, it might be a viable solution.
If you use a browser different than Firefox or Chrome which does support bookmarklets, you should be able to click and drag the Bookmarklet onto the bar of your bookmarks / favorites. The Bookmarklet is a bit of a special bookmark: when clicked, instead of sending the user to a different web page, it executes a piece of Javascript code.
Keep in mind that Firefox or Chrome are currently more effective while using the KJuicer, because they use standard and easily testable technologies. In the event that you wish to use IE we know that the KJuicer is quite well supported from version 11, while 10 and 9 might give some problems.
For Edge, the newest Windows 10 browser: the KJuicer works, but the bookmarklet is slightly more cumbersome to install. The general procedure is explained well in this page.
In short: you need to ask Edge to display the bookmarks’ bar, and insert a bookmark there. We suggest bookmarking this page which will give you the KJuicer’s name. Then you want to open the file manager and edit the bookmark, which is actually a file, by replacing the URL with the JavaScript code of the bookmarklet (see later). Usually before doing so you have to tell the File Manager to display also hidden files, and you do it from the View menu of the File Manager itself. The address where you will find the bookmark in the File Manager of your Windows 10 PC should be this:
C:\Users\{username}\AppData\Local\Packages\Microsoft.MicrosoftEdge_{randomstring}\AC\MicrosoftEdge\User\Default\Favorites\Links
{username} and {randomstring} vary depending on the PC, but it should not be difficult to find them.
To edit the bookmark and turn it in the KJuicer bookmarklet just click on its name with the right button, and replace the url with this string:
javascript:{var%20s=document.createElement('script');s.src='//unibocconi.kjuicer.com/static/bookmarklet/js/bookmarklet.js';document.body.appendChild(s);s.onload=function(){init('unibocconi.kjuicer.com')};};void(0);
1.3 Loading your own documents
To underline and extract hierarchical summaries on your own documents, or documents that are not available within HTML web pages, you can use the loader. At present the loader allows you to upload only html documents in the KJuicer. If documents are not html yet, they must first be turned into html. To convert we suggest two methods:
- Save or export the document in html from the instrument that is being used to create them. Many editors now allow that, including Word, Libre / Open Office, etc.
- Convert the document. The most complex conversion is usually for PDF documents, and for this we suggest the free online conversion tool provided here, so far the best we have found. If documents are complex and you are not satisfied with the results, a suggestion might be to convert your document into doc or odt, so that you can edit, and then use Libre Office Writer (a free and open source tool) to save it into html. In any case there are many online resources for converting to html.
The KJ loader is located here, or you can access it from the Upload (experimental) button from the unibocconi.kjuicer.com website, or from a page with the KJuicer. You have to be logged in in order to see the Upload menu. In case you use Firefox, an alternate and slightly faster way is to open the html file from Firefox itself (File/Open) and click on the KJuicer extension which directly creates the KJuicer page.
2 Use
The Extensions and the Bookmarklet are activated by pressing them, and they will:
- Create a cached version of the original page, i.e. the KJ will make a snapshot and will save it with a new web address; this allows us to remove any code that might interfere with the KJ functionality and locks the text in its place, since updates of the page could mess highlights up;
- Provide the KJuicer’s user interface.
Bear in mind that if you have an account AND you are logged in, by pressing the Extension or the Bookmarklet in addition to creating a KJ page it will store it in your own Personal Wall and will publish it on the Public one. In the future you will be able to prevent it to publish it in the Public Wall, and also to encrypt the page.
2.1 Features
2.1.1 Premises
The KJuicer is a tool that allows you to extract your own notes out of a text just by underlying it. Since you can underline with different colors and such colors are assigned a priority, you can choose to highlight core concepts and enrich them with two additional sets of less meaningful details. The tool then instantly uses your highlights to create corresponding layers of text, that become precious to navigate it, for you or for other readers.
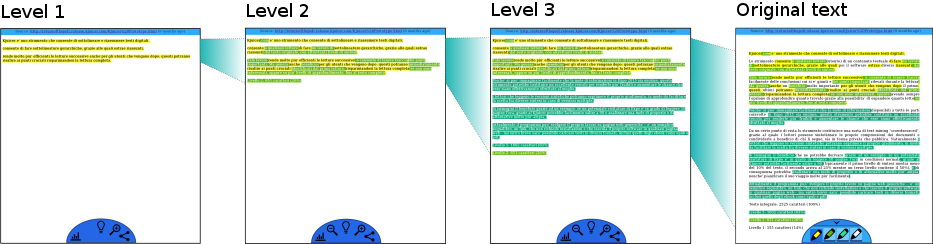
When text is highlighted, the KJ directly builds such new layers, which we mostly refer to as Levels, without the need to instruct it to do so. The new Levels are immediately available for viewing and reading. Each Level is a differently sized summary of the original content, built by extracting the text that has been highlighted: the smallest summary is created by extracting texts underlined in yellow; the second Level is built by displaying all of the text highlighted in yellow, but expanded with the content highlighted in light green; the last Level displays all of the highlighted text, and is therefore the longest summary. The navigation mechanism allows to use these three Levels in a much more useful way than mere summaries though. Use is the best way to realize this last statement.
A few points to bear in mind follow. The Levels are organized with the level of the original content as the basis, and the other layers might be viewed as structures “above” it. The following figure tries to represent what we mean:
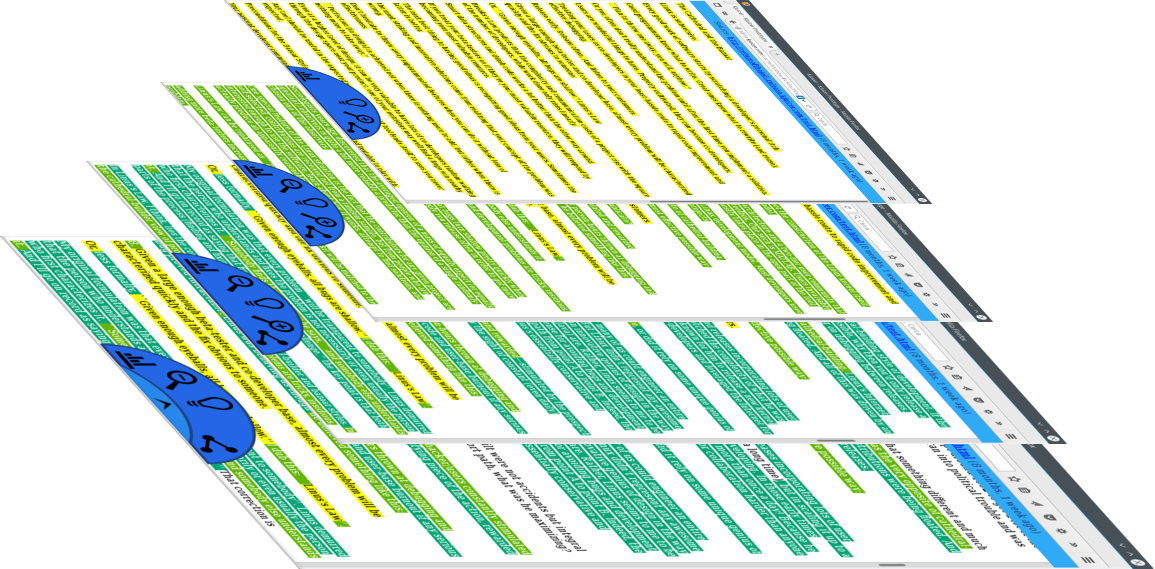
The various text levels remain linked together thanks to the navigation mechanism. We use a picture again to make this concept, hoping to succeed:
From now on when we refer to moving down or zooming in the text, we mean switching to a layer with more details, down to the original content -which for now is the bottom of the newly formed text structure; when we refer to moving up or zooming out one or more Levels we mean switching to a layer with less details, climbing up to the yellow one which it is the topmost.
2.2 Underline
Underlining is done using the highlighters’ bar.
It looks like this:

on mobile:

To reach the highlighters’ bar you need to click the “Edit” botton, the leftmost button of the viewing bar;

on mobile:

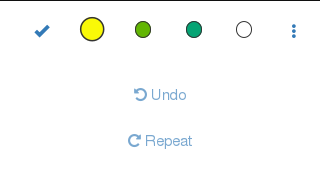
The three colored dots correspond to three different markers, each with its own priority: Yellow is the most important or highest in priority, the Light Green one is used for the second Level and therefore slightly less important highlights, while the third or Dark Green is the last level of priority and should be used for everything else worth making a note of. The fourth or the White marker is an eraser. They will generate three summaries or Levels, more on it later.
To highlight a portion of the text just pick your desired color: from that moment on selecting the text will underline it. In case you choose white it will make the highlight disappear, because as we mentioned white is our eraser. In case a highlight is already present, by selecting the text you are overriding the previous work and the highlight will be updated to your new choice.
A special note for mobile use, with a smartphone or a tablet: given that a web-app cannot control the mobile device user interface, when you underline on mobile you will need to perform an additional operation: after selecting the text a cyan “HIGHLIGHT” button will appear on top of the page, and text will be highlighted only after pressing such button.
At the right of the standard highlighters’ bar you find the undo and repeat buttons. They can help in case you need to undo one or more of the last few highlights. You can undo up to ten highlights made in the current session, and you can redo them with the repeat button, which restores the last underlying that was canceled. On mobile or smaller screens you can display the undo and repeat buttons by clicking first to the rightmost three dotted button, which will bring them up:
2.2.1 How to underline
The text that is underlined is used by the KJ to extract one or more text layers: if you underline using just one color, you will have only one summary. If you use two colors you will have the original text plus two summaries, while if you underline in all the three available colors you will have three Levels in addition to the original text.
It is therefore worth keeping in mind a few things:
- As we mentioned highlights are hierarchical, i.e.: the yellow color should be used to underline crucial content, light green for things a little less important, dark green to mark everything else that need to be marked; currently Levels are only three, but soon it will be possible to add additional ones;
- Highlighted text should make sense if re-read by itself. While this is true in absolute terms for yellow underscores, for light green highlights the content that needs to remain readable is the yellow combined with the light green; dark green highlights, instead, should remain readable together with all the other highlights. It sounds complicated, but it will become clear very quickly just by trying.
- To fine tune one’s ability to underline hierarchically, it is useful to go to the results of the highlights in the resulting summaries and check them. This is easily done by clicking on the leftmost button of the highlighters’ bar (the “check” sign), and then select the color of the summary that you want to look at.
Point 3 instructions are also very handy when studying a text: at every reference of the script to previously explained steps, the navigation mechanism allows to clarify and integrate them with the newly explained content in just three or four clicks. The new material will also act as a check for the highlighting job: you will immediately see if all the necessary elements to understand the current section have been marked in your earlier read. The navigation interface will be explained in further details in the next section.
Some users find it useful to highlight everything interesting with dark green first, then select the light green parts among the dark green ones and finally choose yellow highlights; others find it faster and/or more effective to build directly the yellow / light green / dark green hierarchy, which at first sight might looks more complicated. Every user should find his own way.
Highlights are saved in real time. When you completed underlining a new piece of text, you will see in the top-right section of the top bar a briefly flashing sentence “Saved successfully”, like this:

This confirms that all recent changes have been saved on our servers. In case you are performing a large job make sure you saw this confirmation before leaving the page.
2.2.2 Forking/copying documents
Documents that are not KJuiced by yourself are generally “protected”: the highlights cannot be changed in order not to mess someone else’s job. In certain cases they might not be, so please bear in mind that, before proceeding to modify someone else’s work. When a set of highlights is protected trying to open the highlighters’ bar will show this option:
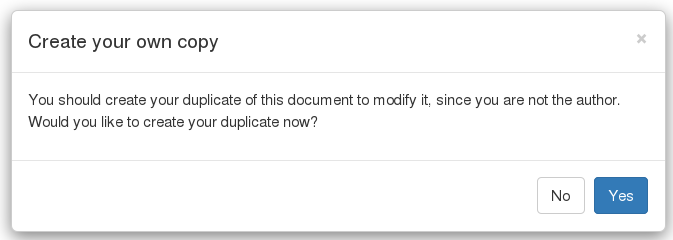
By pressing Yes the KJ will create a new version of the current document, with its own link, complete with all of the original’s highlights, but they can now be modified. It will also store it in your Personal Wall. The term “forking” is used in programming, and it indicates the creation of a different version of the same piece of software.
2.3 Navigation
2.3.1 Commands
The navigation interface is displayed when the navigation or viewing bar is active. The viewing bar looks like this:
on mobile:
If you are currently using the highlighters’ bar, to go back to the navigation bar simply press the leftmost button of the highlighters’ bar (the “check” sign), which will make the viewing bar appear.
To zoom in and out of the text, or go to a different Level, select the color of the summary that you want to look at. In this case the white dot represents the original content, the dark green is the largest summary created combining all of the highlighted text, the light green is the medium sized summary, while the yellow dot will show your only the core content. The largest dot shows what view you are currently on.
A useful variation of zooming in is represented by the fact that you can explore the details of a word, sentence or paragraph also by clicking on it: the difference is that in this case the KJ will take you to a more detailed layer right at the point where the sentence on which you clicked is. The chosen sentence will briefly flash, so that you can identify it easily. When you click on a sentence the KJ will use it as a reference point for the next zoom-ins or zoom-outs.
2.3.2 Other features found in the viewing bar
In the viewing bar, there are three more buttons:
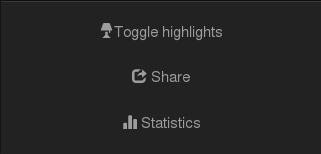
- the Lamp or “Toggle highlights”: it switches on and off the highlight colors to improve readability, if requested, in all Levels; the fact that they are not visible does not mean they are no longer there;
- the Sharing button or “Share”: it creates a link to share the “kjuiced” document (the document which has been underlined using the KJ); you can send the link in a mail or message, or share it by other means; the sharing creates a link to the exact version you are currently viewing: if you click it while on the summary view, for example, the link will bring you back at that view, while if you share on the original content that’s what will be opened by the recipient. Bear in mind that a document might be covered by copyright, and therefore sharing it might constitute a copyright infringement;
- the bar chart button or Statistics: it will pop up some statistics on the underlined texts at the different Levels, and will show the percentage of the highlighted text in relation to the total written content; at the moment this function is useful when highlights have been completed, since otherwise the numbers are less relevant.
In the mobile version of the KJuicer you can access these functions by clicking on the three vertical dots button located at the rightmost corner of the bottom bar, and they will pull up like this:
3 Website menus
While on a KJ page, you will see the top bar:

On mobile the menus are accessed by clicking on the rightmost three lines button, and you might see them in this way:
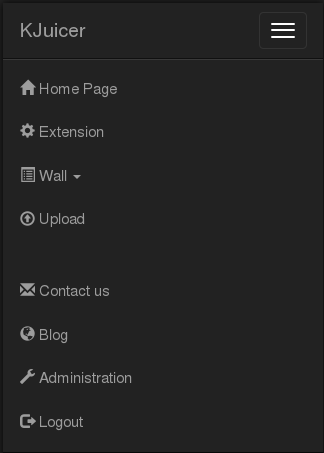
Let’s have a look at the functions in it:
3.1 KJuicer
This is a link that will bring you to the KJuicer.com website. At present a Persona account on the UniBocconi version is a separate account from the KJuicer one. In case you were interested in having a personal account you should register yourself on the KJuicer.com website as well. The Public Wall on the standard KJuicer website shows all other KJuiced documents, unrelated to your work in the class, and is accessible to other users.
3.2 Home Page
The Home Page link brings you to a brief presentation of the KJuicer.
3.3 Extension
A link to install the Kjuicer’s Extensions for Firefox and Chrome or the Bookmark, as explained in Section 1 - Installation.
3.4 Wall
This is a drop down menu that will propose you access to either your Personal Wall or the Public Wall.
3.4.1 The Personal Wall
The Personal Wall is your collection of documents/highlighted versions, either created, forked or uploaded. So a document is added to your Personal Wall when:
- You click on the Extension to cache and underline a web page as described above in Section 2, or
- Every time you choose to fork an existing KJuiced document -see Section 2.2-, or
- When you upload your own document, see Section 1.3.
3.4.2 The Public Wall
The Public Wall at unibocconi.kjuicer.com lists all of the documents and highlighted versions created in your class. In the alpha.kjuicer.com version of the KJuicer website the Public Wall shows all of the public KJuiced documents created by all other users.
3.4.3 The Walls’ elements
In the Walls you fill find the full list of documents, be them yours or others’. This is an example:

Each rectangle of the Wall identifies an item. Its elements are:
- ID and description – A unique number identifier corresponds to each set of Highlights, and it has a description. A document might have more than one set of highlights available. By clicking on the document’s ID you can see a particular document’s set of highlights.
- Source – It shows the original link of the document, usually a web page. It could also show a file’s path, if it has been uploaded. If you uploaded it, the path will be a reminder or where it is on your PC, otherwise it will not mean anything to you.
- Owner – The Gravatar symbol or the user’s icon tells you, when available, infos about the user that created that particular set of highlights. In the Personal Wall the owner is always you, in the Public Wall you might find your course peers.
- Last edit – This field shows how long ago this set of highlights has been modified.
3.5 Upload
This is the function that allows you to upload an html document of your choice. Please see Section 1.3 for using it.
3.6 Related
This is a drop down button that -when present- will show you other sets of highlights for the document displayed, if there are any. It will show a list of numbers, and by clicking on a specific one you will be able to access it and read the same document with a different set of highlights. If it is not write protected you should also be able to modify it, which is always the case if you are the owner of the set of highlights.
3.7 Contact us
It is a mailto:info@kjuicer.com button: when pressed it will pull up your predefined mail client and pull up a “Compose mail” window with the info@kjuicer.com address pre-filled.
In case you do not use the mail client of your pc/mobile device you can right click/long press the Contact us button, copy the address and paste it in the address field of the desired mail interface to write to us. Please do not hesitate to contact us in case you need support, and the more so if you encounter a bug and wish to report it.
3.7.1 Reporting Bugs
In order to report a bug, it is very important to send us the information that allows us to solve the problem. Among them there are:
- Which Operating System (Windows, Apple or which Linux distribution) or Mobile platform you are working on (Android, iOS, etc);
- The version of such OS (examples might be: Windows 10 or 8, OsX 10.9, Ubuntu 15.10 or Fedora 23, or else) for laptop/desktops; the version of the Android or iOS or else for a mobile device;
- The browser’s name and version;
- What you were doing when the bug happened, and possibly
- The steps that we should follow to reproduce it, with a mention if the bug happens all the time you perform such actions or if it happens only sometimes.
We will get back to you as soon as possible to report if we could fix it or ask for additional information.
We know that reporting bugs is a little nuisance, but please know that we are very grateful if you do, and we will put our best effort in addressing them as effectively and fast as we can.
3.8 Blog
By clicking on the Blog menu you will be brought to our Blog, where you can find info, news, tutorials, etc.
3.9 Login/Logout
As explained in Section 1.1 this is the access to the Login/Logout functions, and if you do not yet have an account by clicking on the Mozilla Persona option you will be prompted to create one.
4 Notes
Images and tables for the time being are not carried in the summaries. It is still a Beta version, and we hope to put that too in place within a reasonable time.
In certain setups, you might receive a security message that warns that you are visiting a non safe page, or you are installing a component that is not safe. This is due to the fact that the service is still provided on a temporary server, suitable only for a few users, therefore we have not yet purchased the final SSL certificate. But it is a professional and reliable service, and likewise our code. Confirm your browser that you are aware of the risks, and proceed by visiting the page or by installing the component. If it asks you whether to add a security exception for our page, you can proceed to do so.